Oblivion:Random Oblivion World 7
| This place page is currently being rechecked as part of the Oblivion Remastered Project. The page is being checked in several stages to verify any changes due to the release of Oblivion Remastered. All users are welcome to make changes to the page. If you make a change that is relevant to the project, please update this template accordingly, and make sure you have observed the project guidelines. Details Walkthrough: not written Interior Remastered Images: not added |
| Oblivion World: Random Oblivion World 7 (lore page) | |
|---|---|
| # of Peripheral Towers | 2 |
| # of Non-Random Caves | 1 |
| Important Treasure | |
| |
| Console Location Code | |
| Worldspace: OblivionRD007 OblivionRD007Cave01 OblivionRD007SmallTower01 OblivionRD007SmallTower02 | |
| Fixed Gate | |
| Gate outside Anvil (map) (after Dagon Shrine has been completed) | |
Random Oblivion World 7 is a medium-sized World, and one of seven randomly chosen Oblivion Worlds.
The Oblivion Gate in front of Anvil always connects to this world.
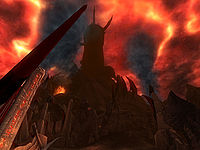
When you first emerge from the gate, you can see the main tower ahead of you on top of a hill, and a path heading away from you and curving away to the left. In order to reach the main tower, the normal route goes through a series of caves which lead to a progressively higher set of paths ascending the hill. It is also possible, if you have a high Acrobatics skill, to simply make your way up the rocks and ascend the hill to the base of the main tower without using the caves.
Two secondary towers may be found in this world, although neither of them connects to the main tower in any way: Reapers Sprawl, which is visible to the southeast from where you enter this world, and Meat Harbor. Both contain minor loot.
Contents
Notes[edit]
- There is a large circular island in between the two secondary towers but it hosts nothing except for a huge fire.
Exterior[edit]
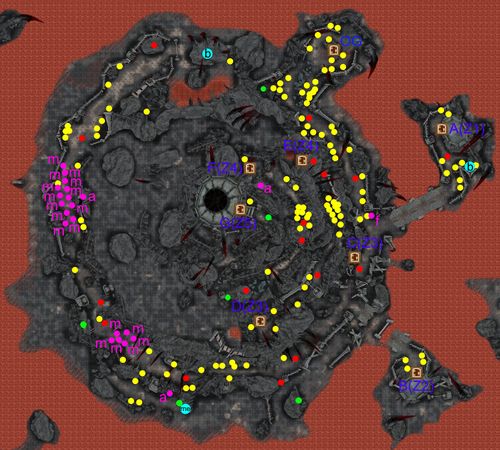
From the Oblivion Gate (OG), follow the path heading southeast, looting a Fleshy Pod Bag along the way. After dispatching two enemies, you will reach an intersection which is guarded by a Fire Turret trap (f). Head east over a bridge to access the secondary tower Reapers Sprawl via door A. Just outside you will find an enemy guarding a Blood Fountain. Retrace your steps and head south along the path instead. You will shortly arrive at door C, which is guarded by another enemy and leads to the Nether Tunnels. These are 2-3 random Oblivion Caves.
The route to the Sigil Keep is through the caves, but if you are interested in more loot continue south along the path instead. You will shortly arrive at another intersection. Heading southeast past a collapsed bridge leads you to door B, which provides access to the secondary tower Meat Harbor. Following the path to the southwest leads you to two enemies and to a small path branching off to the southeast. Atop a nearby rocky outcrop is a Fleshy Pod Sack.
Return to the main path and continue west, battling past an enemy until you reach an area with six Land Mine traps (m) blocking the way. Two more enemies lie beyond the mines, and attracting them towards you can help you clear the mines. Just past the mines you will see a Fleshy Pod Sack sitting on a rocky ledge, but head southwest instead through a gap in the walls. Follow the path until you reach a Magicka Essence (me) and a hanging Fleshy Pod, while taking care to avoid the Avalanche trap at a.
Return to the main path, dispatch a nearby enemy and follow it north until you arrive at an area with 18 Land Mine traps (m), which can prove very difficult to navigate without setting them off. Beware also of the Avalanche trap (a) about halfway across the mined stretch. Follow the path, battling past two more enemies, until you reach a Blood Fountain (b) and a dead end. From here you'll need to retrace your steps to door C.
Once you have negotiated the random Oblivion Caves and emerge from door D, you will find yourself on a higher level of the main hill, overlooking Reapers Sprawl. From here follow the path upwards, battling past an enemy, until you reach a row of densely packed Spiddal Sticks. Beyond this are two more enemy guarding door E, which leads to The Red Gnash Channels.
After making your way through the Channels, you will re-emerge at door F, just below the Sigil Keep tower. Take care to the avoid the Avalanche trap (a) above just as you emerge and follow the path southeast until you reach a hanging Fleshy Pod guarded by a Daedra. Along the way you'll face three more enemies and also have to negotiate another densely packed row of Spiddal Sticks. Follow the path upwards, loot a final hanging Fleshy Pod and then use door G to enter the Tower Portal, which is a randomly selected Sigil Keep tower from one of the 5 possible presets.
Occupants:
- 18 Daedric enemies (Daedra or Dremora)
- Two enemies are spawned in the same location (near the second clustered Spiddal Stick area) and thus appear as a single dot on the map.
- Another enemy is clipped into a rock next to the northern Blood Fountain, and therefore cannot be encountered.
- 1 Daedra
Treasure:
- 1 Fleshy Pod Bag
- 2 Fleshy Pod Sack
- 3 Fleshy Pod Ext
- 1 inaccessible Fleshy Pod Ext, which is clipped into some rocks in the northwestern corner of the island
Plants:
- Plants are marked by yellow dots on map
- 59 Blood Grass plants
- 19 Harrada plants
- 41 Spiddal Stick plants
Traps:
- 3 Avalanche traps at locations a on map
- 1 Fire Turret trap at f
- 18 Land Mine traps at m
Doors and Gates:
- There are eight doors in/out of this zone
- 1 Oblivion Gate (at OG) leads to Tamriel
- 1 door (at A) leads to the zone Reapers Sprawl (Z1)
- 1 door (at B) leads to the zone Meat Harbor (Z2)
- 2 doors (at C and D) lead to the zone Nether Tunnels (Z3)
- 2 doors (at E and F) lead to the zone The Red Gnash Channels (Z4)
- 1 door (at G) leads to the zone Tower Portal (Z5)
Other:
- 2 Blood Fountains at locations b on map
- 1 Magicka Essence at me
Reapers Sprawl[edit]
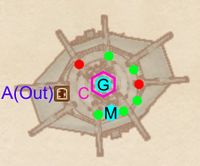
You will start off on the lowest level of the tower once you enter from door A. Dispatch the nearby enemy and loot a hanging Fleshy Pod. Three more Fleshy Pods hang from the rim of the middle level, and can be accessed with a very high Acrobatics skill or by activating the Corpse Masher lift and jumping to them. Once you've defeated the enemy at the top of the lift and looted the nearby Fleshy Pod, make your way up past a few hanging and burning corpses. The highest level hosts a Brood Cage (C) containing a dead Mythic Dawn Guard (G). The lever nearby at M (The Cage Master) will open the bottom of the cage and release the guard, who ends up impaled on the lift's central spike.
Occupants:
- 2 Daedric enemies (Daedra or Dremora)
- 1 Mythic Dawn Guard (dead) at location G on map
Treasure:
Doors and Gates:
- There is one door (at A) in/out of this zone, leading outside
Other:
- 1 Brood Cage at location C on map, highest level
- 1 The Cage Master at M, highest level
Meat Harbor[edit]
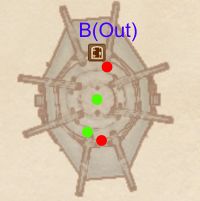
Upon entering from door B you will find yourself on the lower level of the tower, alongside two enemies. Once you've defeated them, take the Corpse Masher lift to the middle section and then climb your way up. After passing many hanging corpses and a Fleshy Pod, you'll arrive at the highest level which hosts a The Punished container.
Occupants:
Treasure:
Doors and Gates:
- There is one door (at B) in/out of this zone, leading outside
Nether Tunnels[edit]
This zone is entered via door C and exited via door D. It consists of 2-3 random Oblivion Caves, selected from the 21 possible presets.
The Red Gnash Channels[edit]
Upon entering from door E, you will likely face two enemies simultaneously or in quick succession. Separate paths branch out southwest and northeast; while both eventually lead to the same room, take the former to access a Fleshy Pod. After battling past two more enemies you will arrive in the final room with another enemy and two Fleshy Pods. Use door F to return outside.
Occupants:
Treasure:
Plants:
- Plants are marked by yellow dots on map
- 1 (aggressive) Harrada plant
Doors and Gates:
- There are two doors (at E and F) in/out of this zone, both leading outside
Tower Portal[edit]
This world's Sigil Keep is a randomly selected tower from one of the 5 possible presets.


